
Sub optimal levels of specific nutrients in soil will limit the potential of grass production. As it is now timely to complete soil testing on farm, in this article we focus on the chemical properties of the soil and outline a good soil sampling technique.
A healthy soil is essential to producing a high yielding, high quality crop of grass throughout the year and there are 3 elements that contribute to that healthy soil status.
- Biological – this refers to living organisms in the soil, including bacteria, fungi, nematodes, earthworms etc. These help break down litter and cycle nutrients through the soil. Earthworms help create a healthy soil structure by eating decomposing plant material and creating channels through which air and water can permeate.
- Physical – this refers to the physical structure of the soil, including particle size and compaction, ability to store water and allow drainage. Good physical structure will enable rain infiltration; reducing runoff and soil erosion while supporting good soil aeration. Good physical structure will also support the root development of plants.
- Chemical – this relates to the pH and nutrients in the soil. Organic Matter (OM) is a store of nutrients including N and P which can be made available to the soil through mineralisation. Each percent of OM in soil represents about 1000 kgs of organic nitrogen in addition to other nutrients. This can be useful in explaining why grassland farms that converted from long-term tillage often yield less than expected in the early years. Tillage farms, although generally acceptable in terms of P and K content, are generally low in OM. The longer the land was under continuous tillage, in general, the greater the problem.
Over 80% of grassland soils in Ireland are suboptimal in either pH, P or K. This is severely limiting potential grass production from these soils. Soil testing is the first step in meeting nutrient requirements to maximise grass or crop production. The information presented in a soil test allows you better understand the requirements of individual fields and you can then put a plan in place to correct issues where they arise.
A fertile soil will contain all the major nutrients for basic plant nutrition:
- Nitrogen (N) – No soil test available
- Phosphorus (P)
- Potassium (K)
- as well as other secondary nutrients needed in smaller quantities:
Calcium (Ca)
Magnesium (Mg)
Sulphur (S)
and trace elements: Iron (Fe), Manganese (Mn), Zinc (Zn), Copper (Cu), Boron (B) and Molybdenum (Mo).
When soil sampling, P and K are the most common nutrients tested for along with soil pH. The most limiting nutrients for plant production are N, P and K. Secondary nutrients can be tested for, but must be specified when submitting soil samples. Generally, there is no need to test secondary nutrients unless you have been advised of a specific problem.
When to sample your soil
It is best to soil sample at a similar time each year for comparison and avoid sampling when soils are extremely wet or dry. The ideal time to sample soils is from September to March and the advice is to wait 3-6 months after the last application of P, K or slurry to generate an accurate result. Therefore, the month of January is often the ideal time on many farms. This will allow you to put a fertiliser plan in place for the year ahead to target specific fields for specific nutrients. Ideally the entire farm should be sampled every 2–4 years (or a proportion of the farm e.g. 30% per year to spread fertiliser costs).
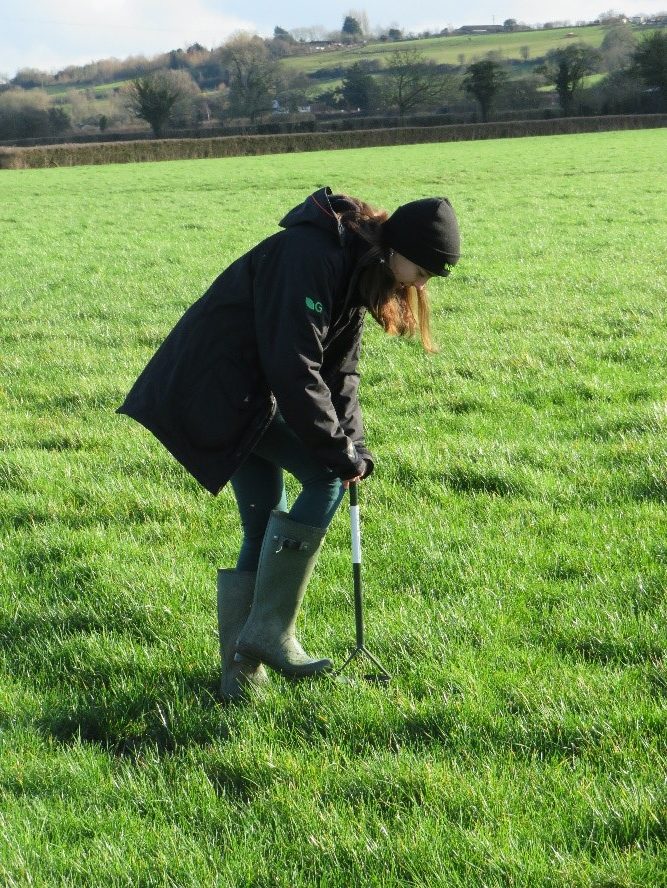
How to soil sample
|
|
|
|
|
|
|
Utilising the result
There is no point in sampling your soil unless you utilise the results. By applying the correct rate of fertiliser in the right field you will not only improve yield performance from the whole farm but will save money. When you get your soil sample results it is important to then develop a fertiliser program specific to each field.
Potassium can be spread all year round (there is no restriction on its application), nonetheless there are a few points to consider. In spring, K applications should not exceed 90 kg k/ha in a single application. If you have a requirement above that it would be best to apply the balance in autumn. On rapidly growing swards which receive high levels of K grass tetany can occur, as it prevents Mg uptake by the grass crop. Regardless, it would be best practice not to apply any fertiliser in high amounts in one application and split the application to get best results.
Soil pH – The most important deficiency to correct and the cheapest one! For grassland, target a soil pH of 6.2 to 6.5 (pH 5.5 on peaty soils). Apply lime according to soil test recommendations. A maximum of 7.5 t/ha (3 t/acre) should be applied in any one year. For recommendations greater than that, split the application and apply the balance 2 years later.
Benefits of correcting pH
- Releases up to 80 kgs of nitrogen from the soil compared to low pH soils
- Makes P and K more available in the soil
- Increases efficiency of applied N, P and K fertiliser
- Increases grass DM yield by approx. 1.5 t DM/ha (compared to low pH soil)
Phosphorus is necessary for physiology of the plant, including photosynthesis, root and tiller development. Like other nutrients P can get “locked–up” in the soil if the pH is low; another reason why correcting soil pH should be the first step in improving soil fertility. Phosphorus use is restricted within the Nitrates Directive.
Many farms create a farm map showing which fields are low in P and K and this is very useful when deciding where to spread slurry. Speak to your advisor, local merchant or rep who are generally happy to help draw up a fertiliser plan to meet your needs. Put your plan in the tractor so when it comes to spreading fertiliser you know what fields need what products.